
BeastlyBeasties.etsy.com

I recently participated in The Artist Studio Tour. As usual I had a space at the Baird in South Orange. In order to better display my t-shirts and prints, I did a fair amount of research, which I put to good use. As a result I had many compliments on my set up, and drew quite a crowd into my little corner. The only drawback was that it took me longer than I had expected to set up and take down. However, the benefits were well worth the extra time.
Create an Enticing Space. The most important thing that I learned was that one should never place oneself behind a table. This creates a barrier and is very uninviting. Think of your space as a mini store. You need to create a space that people can walk into. I put my tables perpendicular to the wall and created a little corner store that people could walk into and explore.
Make Sure That You Have Items At Different Levels. This is important as it keeps your customer interested, and moves the eye around your "booth". I hung prints on the walls gallery style, some were framed and others were not. I grouped similar items together to make a comprehensive and attractive display. When hanging images, pay attention to which colors look good next to each other.
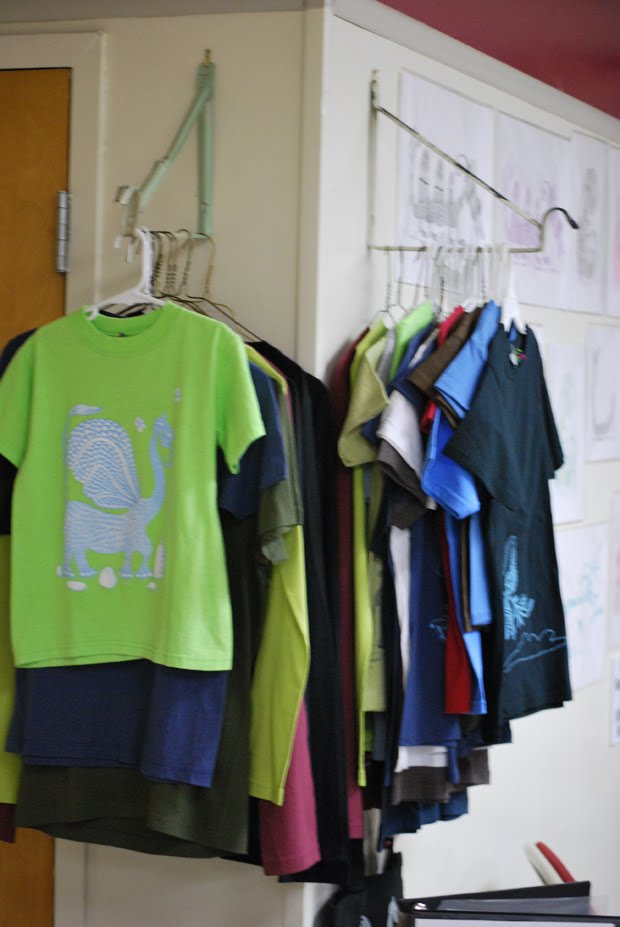
To add interest, I had a couple of brackets that I had found whilst rummaging around our basement attached to the wall. Perfect for hanging t-shirts on hangars from. I put one inside the "store area" and one out side. This made it possible for customers to browse a range of shirts and to see the full design with out having to unfold the ones on the table.

Use Multiple Forms of Display to Add Interest. In the past I just laid my t-shirts out in rows on the table sorted by size and design. It looks flat and gets untidy pretty quickly. My solution this time was to use a manikin that I was lucky enough to borrow for the day. I had also been on the look out for cheap manikin substitutes. I found these at Marshalls on clearance for $7.00 a piece. I think they were meant to be some kind of bathroom rack, perhaps to hang hand towels on. I had some lengths of plastic tubing from an old kids tent that I was able to lay across a pair of hooks. Perfect for putting through the arms of the t-shirts. A couple of scarfs artfully arranged and they looked great.
Create an Enticing Space. The most important thing that I learned was that one should never place oneself behind a table. This creates a barrier and is very uninviting. Think of your space as a mini store. You need to create a space that people can walk into. I put my tables perpendicular to the wall and created a little corner store that people could walk into and explore.
Make Sure That You Have Items At Different Levels. This is important as it keeps your customer interested, and moves the eye around your "booth". I hung prints on the walls gallery style, some were framed and others were not. I grouped similar items together to make a comprehensive and attractive display. When hanging images, pay attention to which colors look good next to each other.
To add interest, I had a couple of brackets that I had found whilst rummaging around our basement attached to the wall. Perfect for hanging t-shirts on hangars from. I put one inside the "store area" and one out side. This made it possible for customers to browse a range of shirts and to see the full design with out having to unfold the ones on the table.
Use Multiple Forms of Display to Add Interest. In the past I just laid my t-shirts out in rows on the table sorted by size and design. It looks flat and gets untidy pretty quickly. My solution this time was to use a manikin that I was lucky enough to borrow for the day. I had also been on the look out for cheap manikin substitutes. I found these at Marshalls on clearance for $7.00 a piece. I think they were meant to be some kind of bathroom rack, perhaps to hang hand towels on. I had some lengths of plastic tubing from an old kids tent that I was able to lay across a pair of hooks. Perfect for putting through the arms of the t-shirts. A couple of scarfs artfully arranged and they looked great.

Instead of putting all my shirts out, I just put a couple of each design out in each size. I then replenished from a box hidden beneath the table when things sold. This made for a much more manageable table and a much more sophisticated look.
To add interest and so that customers could see the t-shirt designs without unfolding them, I used my lengths of plastic tubing to hang t-shirts from on the wall. I balanced the tubing on a push pin. It worked great and looked a lot better than using hangars. This method also avoids stretching the necks of the shirts. I like to use children's hangars for hanging t-shirts as far as possible. They are smaller and are less likely to stretch the neck holes.
Arranging Merchandise. I arranged the shirts organically around the bases of my mannequins. I put the darker t-shirts to the front, and the more colorful ones towards the middle of the table. The eye will see the dark shirts and then be drawn in to the colorful shirts in the middle. I always put the white shirts away from the edges of the table as they get grubby easily.
Table Coverings. Use an attractive cloth covering to your table. It should cover the table and then fall to the fall on all sides. This enables you to hide your boxes underneath. I have found flat Queen size bed sheets to work well as under cloths. To smarten these up I used some sari lengths that I had bought in India years ago. I had quite a few compliments on them!
Use Attractive Displays and Props That Fit In With The Look of Your Merchandise.
To hold bookmarks I used an old wood cigar box that I had found at an estate sale in Cape Cod. I also had a wire basket to hold cards and a duck wicker basket to hold buttons and magnets. They made for a fun display which fitted in with my merchandise, but did not dominate it.

Payment and Packaging. If possible have a separate small table in a back corner of your booth for paying at and packaging. Use a receipt book with two copies - one for you and one for the customer. I always get the customer to write out their e-mail and name for me at the top of the receipt. I then write out in detail what they have purchased. For t-shirts, I write the size, design and color. This makes it much easier to keep a track of inventory when you get home. For prints, I write out the name, color and number in the edition. This year I purchased some small paper bags to put the t-shirts in. It looks a lot more professional than not using anything. For prints, I have a protective sleeve, cardboard stiffeners and a stiff cardboard envelope. Always put a business card in with your customer's purchase.
A Final Piece of Advice. Greet your customers with a smile and let them know that you are there to help them if they have any questions, then leave them to browse. Never stand at the entrance of your booth. This is intimidating, a bit like getting past the bouncer. People will be more likely to walk if they are made to feel uncomfortable.

