Ann Vollum has a new calligraphy blog showcasing some of her recent work and peppered with fun facts for us Font-o-philes.
This summer she had a number of commissions for wedding calligraphy
Beautiful work Ann!
http://annvollumcalligraphy.wordpress.com/
Saturday, September 25, 2010
Thursday, September 23, 2010
September Meeting
On Monday 20th, September we held our first meeting after the summer break. We are now holding all of our meetings at Parteaz on Springfield Avenue in Maplewood. Our Thanks to Katie for making this location available to us.
For this meeting, the only agenda was to celebrate the one year anniversary of the Guild and to catch up with everyone after the summer break. We all enjoyed home baked treats, coffee and wine whilst we told each other of our latest ventures. Thanks to Aron and Kari's Cafe for home baked treats, Alison and Katie for wine and crackers. It was good to see some old faces and to welcome some new.
We look forward to seeing you all in October when our speaker series for the year starts. We will keep you posted.
Ann
BeastlyBeasties
For this meeting, the only agenda was to celebrate the one year anniversary of the Guild and to catch up with everyone after the summer break. We all enjoyed home baked treats, coffee and wine whilst we told each other of our latest ventures. Thanks to Aron and Kari's Cafe for home baked treats, Alison and Katie for wine and crackers. It was good to see some old faces and to welcome some new.
We look forward to seeing you all in October when our speaker series for the year starts. We will keep you posted.
Ann
BeastlyBeasties
Monday, September 13, 2010
Help with your Home Business - New Adult School Classes
New business classes at the South Orange and Maplewood Adult School
HOW TO BUILD A FUN AND PROFITABLE HOME-BASED BUSINESS:
code: 0026 / $45.00
1 Session(s)
Sat 12-3 pm, December 4
Class Details: Click Here
Instructor(s): JAMES W. FARNHAM
Location: Columbia High School Room D100
Regardless of the company you choose, you’ll learn skills and activities that, step by step, will lay out what it takes to earn more money and have more fun. Gain access to 70 different ways to market your products and services. Discover one simple tool that’s guaranteed to get you more referrals, get your prospects to choose you over and above the competition, and flat out dominate your market. No hype, no fluff … just straight-up, practical information on how to get the job done.
http://www.ssreg.com/som/classes/classes.asp?catID=2657&pcatID=2656
SO YOU WANT TO BE AN ENTREPRENEUR WORKSHOP:
code: 0033 / $35.00
1 Session(s)
Thurs 6:30-8:30 pm, September 30
Class Details: Click Here
Instructor(s): ESSEX COUNTY COLLEGE INSTRUCTORS
Location: South Orange Middle School Room 105
This course provides information and resources for business development, personal assessment for start-up and financial aspects of starting a business. Taught by instructors from Essex County College.
http://www.ssreg.com/som/classes/classes.asp?catID=2658&pcatID=2656
ENTREPRENEURSHIP TRAINING COURSE:
code: 0034 / $265.00
8 Session(s)
Wed 6:15-9:15 pm, October 6 - December 1
No class 11/24
Class Details: Click Here
Instructor(s): ESSEX COUNTY COLLEGE INSTRUCTORS
LocationSouth Orange Middle School Room 101
Learn the essentials of developing and maintaining a profitable and successful business. We will provide you with extensive step-by-step methods that are crucial to the start-up and maintenance of a micro-business. Take that first action-step and register for the training you need to pave the way to business success. Taught by instructors from Essex County College.
http://www.ssreg.com/som/classes/classes.asp?catID=2658&pcatID=2656
HOW TO BUILD A FUN AND PROFITABLE HOME-BASED BUSINESS:
code: 0026 / $45.00
1 Session(s)
Sat 12-3 pm, December 4
Class Details: Click Here
Instructor(s): JAMES W. FARNHAM
Location: Columbia High School Room D100
Regardless of the company you choose, you’ll learn skills and activities that, step by step, will lay out what it takes to earn more money and have more fun. Gain access to 70 different ways to market your products and services. Discover one simple tool that’s guaranteed to get you more referrals, get your prospects to choose you over and above the competition, and flat out dominate your market. No hype, no fluff … just straight-up, practical information on how to get the job done.
http://www.ssreg.com/som/classes/classes.asp?catID=2657&pcatID=2656
SO YOU WANT TO BE AN ENTREPRENEUR WORKSHOP:
code: 0033 / $35.00
1 Session(s)
Thurs 6:30-8:30 pm, September 30
Class Details: Click Here
Instructor(s): ESSEX COUNTY COLLEGE INSTRUCTORS
Location: South Orange Middle School Room 105
This course provides information and resources for business development, personal assessment for start-up and financial aspects of starting a business. Taught by instructors from Essex County College.
http://www.ssreg.com/som/classes/classes.asp?catID=2658&pcatID=2656
ENTREPRENEURSHIP TRAINING COURSE:
code: 0034 / $265.00
8 Session(s)
Wed 6:15-9:15 pm, October 6 - December 1
No class 11/24
Class Details: Click Here
Instructor(s): ESSEX COUNTY COLLEGE INSTRUCTORS
LocationSouth Orange Middle School Room 101
Learn the essentials of developing and maintaining a profitable and successful business. We will provide you with extensive step-by-step methods that are crucial to the start-up and maintenance of a micro-business. Take that first action-step and register for the training you need to pave the way to business success. Taught by instructors from Essex County College.
http://www.ssreg.com/som/classes/classes.asp?catID=2658&pcatID=2656
Wednesday, September 8, 2010
Saturday, August 28, 2010
This week Crafty Katie will be hosting Princess Camp at Parteaz

This week I will be hosting Princess Camp at Parteaz located 1860 Springfield Ave, Maplewood.
Princess Camp is the most magical and creative camp the area has to offer!! I know because I created the games and crafts!! I’ve been busy making a wishing well, and coming up with “princess –like” crafts. I have to say... this was the most girlie -crafting i’ve done in a while.
For the past week, I’ve been up to my ears in pink tulle. I’ve cut 25 tiny, tiny little crowns out of gold sequin pleather and crocheted little pink circles . My hands haven’t stopped cutting or gluing for days!
One of the crafts is called “Princess Portrait”
The kids will make a collage with various materials.
You will need felt, ribbon, beads, yarn, lace and markers, pre-cut matte and matching backing
Paper,
The face and neck, pre-cut felt so that it looks like a head and shoulders. Glue on to paper
Pre cut any “princess colour” felt into a rectangle with the width and length to cover from her neck to the bottom of the paper. Cut out a scoop for around her neck.. Glue on.
String a few beads onto the ribbon. Punch holes around her neck so you can tie the ribbon behind the picture.
Cut lace to the width of the felt. (Add as much as you like)and glue on top of the felt dress.
Cut yarn for hair and glue on. Draw on face
And the final touch- glue on crown
With a hot glue gun- glue matte, picture to backing.
If you get a chance to make this craft- send me a note with a picture!!
If you would like to attend Princess Camp:
Parteaz Camp
@ Parteaz NEW location!
1860 Springfield Ave.
Maplewood
PRINCESS CAMP-August 30th til Sept. 3rd
Attend for a whole week or just a day or two
A little make believe everyday!
Dress - up, tea parties, crafts , manners & FUN!
Bring your lunch! We provide the "tea"!
11:00-12:30
$150/ week
$35 a day
Ages 3 with caregiver
Ages 4-6 Drop-off
Labels:
Crafty Katie,
Parteaz,
Princess Camp
Monday, August 2, 2010
Memories of Maplewoodstock 2010
Thanks to Joy Yagid - local Maplewood photographer for sharing her photos of Maplewoodstock 2010. Email your own photos to jo@bradney.com and share your stories in the comments below.
And BIG thanks to Katie Clayton of Sew Crafty for organising the vendors stalls - hope you are enjoying a well deserved rest Katie!
Labels:
jo bradney,
Joy Yagid,
maplewood,
maplewoodstock,
NJ craft shows
Friday, July 2, 2010
Top Tips for Setting Up a Craft Display
by Ann Vollum of BeastlyBeasties
BeastlyBeasties.etsy.com


Payment and Packaging. If possible have a separate small table in a back corner of your booth for paying at and packaging. Use a receipt book with two copies - one for you and one for the customer. I always get the customer to write out their e-mail and name for me at the top of the receipt. I then write out in detail what they have purchased. For t-shirts, I write the size, design and color. This makes it much easier to keep a track of inventory when you get home. For prints, I write out the name, color and number in the edition. This year I purchased some small paper bags to put the t-shirts in. It looks a lot more professional than not using anything. For prints, I have a protective sleeve, cardboard stiffeners and a stiff cardboard envelope. Always put a business card in with your customer's purchase.
A Final Piece of Advice. Greet your customers with a smile and let them know that you are there to help them if they have any questions, then leave them to browse. Never stand at the entrance of your booth. This is intimidating, a bit like getting past the bouncer. People will be more likely to walk if they are made to feel uncomfortable.
BeastlyBeasties.etsy.com

I recently participated in The Artist Studio Tour. As usual I had a space at the Baird in South Orange. In order to better display my t-shirts and prints, I did a fair amount of research, which I put to good use. As a result I had many compliments on my set up, and drew quite a crowd into my little corner. The only drawback was that it took me longer than I had expected to set up and take down. However, the benefits were well worth the extra time.
Create an Enticing Space. The most important thing that I learned was that one should never place oneself behind a table. This creates a barrier and is very uninviting. Think of your space as a mini store. You need to create a space that people can walk into. I put my tables perpendicular to the wall and created a little corner store that people could walk into and explore.
Make Sure That You Have Items At Different Levels. This is important as it keeps your customer interested, and moves the eye around your "booth". I hung prints on the walls gallery style, some were framed and others were not. I grouped similar items together to make a comprehensive and attractive display. When hanging images, pay attention to which colors look good next to each other.
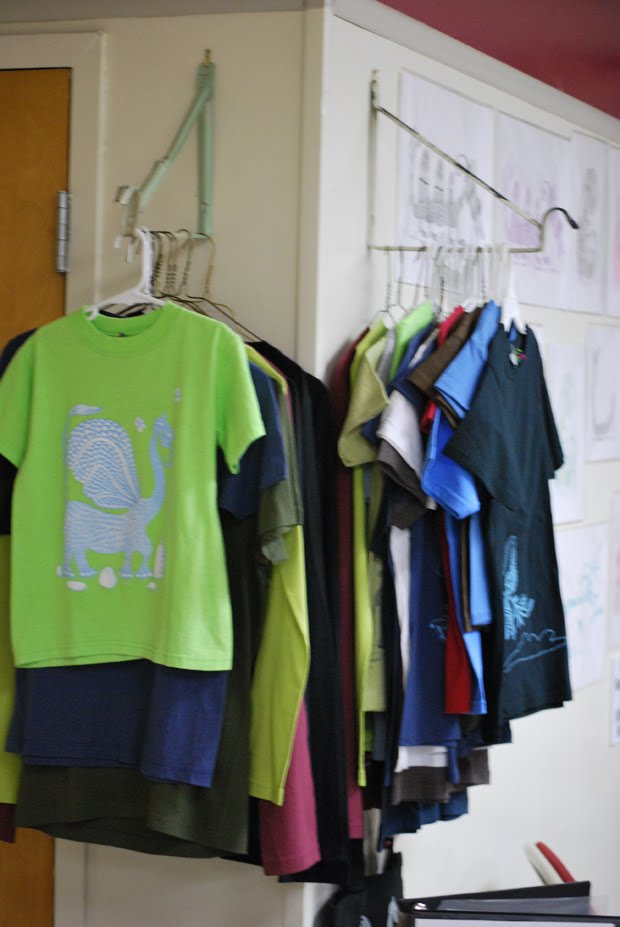
To add interest, I had a couple of brackets that I had found whilst rummaging around our basement attached to the wall. Perfect for hanging t-shirts on hangars from. I put one inside the "store area" and one out side. This made it possible for customers to browse a range of shirts and to see the full design with out having to unfold the ones on the table.

Use Multiple Forms of Display to Add Interest. In the past I just laid my t-shirts out in rows on the table sorted by size and design. It looks flat and gets untidy pretty quickly. My solution this time was to use a manikin that I was lucky enough to borrow for the day. I had also been on the look out for cheap manikin substitutes. I found these at Marshalls on clearance for $7.00 a piece. I think they were meant to be some kind of bathroom rack, perhaps to hang hand towels on. I had some lengths of plastic tubing from an old kids tent that I was able to lay across a pair of hooks. Perfect for putting through the arms of the t-shirts. A couple of scarfs artfully arranged and they looked great.
Create an Enticing Space. The most important thing that I learned was that one should never place oneself behind a table. This creates a barrier and is very uninviting. Think of your space as a mini store. You need to create a space that people can walk into. I put my tables perpendicular to the wall and created a little corner store that people could walk into and explore.
Make Sure That You Have Items At Different Levels. This is important as it keeps your customer interested, and moves the eye around your "booth". I hung prints on the walls gallery style, some were framed and others were not. I grouped similar items together to make a comprehensive and attractive display. When hanging images, pay attention to which colors look good next to each other.
To add interest, I had a couple of brackets that I had found whilst rummaging around our basement attached to the wall. Perfect for hanging t-shirts on hangars from. I put one inside the "store area" and one out side. This made it possible for customers to browse a range of shirts and to see the full design with out having to unfold the ones on the table.

Use Multiple Forms of Display to Add Interest. In the past I just laid my t-shirts out in rows on the table sorted by size and design. It looks flat and gets untidy pretty quickly. My solution this time was to use a manikin that I was lucky enough to borrow for the day. I had also been on the look out for cheap manikin substitutes. I found these at Marshalls on clearance for $7.00 a piece. I think they were meant to be some kind of bathroom rack, perhaps to hang hand towels on. I had some lengths of plastic tubing from an old kids tent that I was able to lay across a pair of hooks. Perfect for putting through the arms of the t-shirts. A couple of scarfs artfully arranged and they looked great.

Instead of putting all my shirts out, I just put a couple of each design out in each size. I then replenished from a box hidden beneath the table when things sold. This made for a much more manageable table and a much more sophisticated look.
To add interest and so that customers could see the t-shirt designs without unfolding them, I used my lengths of plastic tubing to hang t-shirts from on the wall. I balanced the tubing on a push pin. It worked great and looked a lot better than using hangars. This method also avoids stretching the necks of the shirts. I like to use children's hangars for hanging t-shirts as far as possible. They are smaller and are less likely to stretch the neck holes.
Arranging Merchandise. I arranged the shirts organically around the bases of my mannequins. I put the darker t-shirts to the front, and the more colorful ones towards the middle of the table. The eye will see the dark shirts and then be drawn in to the colorful shirts in the middle. I always put the white shirts away from the edges of the table as they get grubby easily.
Table Coverings. Use an attractive cloth covering to your table. It should cover the table and then fall to the fall on all sides. This enables you to hide your boxes underneath. I have found flat Queen size bed sheets to work well as under cloths. To smarten these up I used some sari lengths that I had bought in India years ago. I had quite a few compliments on them!
Use Attractive Displays and Props That Fit In With The Look of Your Merchandise.
To hold bookmarks I used an old wood cigar box that I had found at an estate sale in Cape Cod. I also had a wire basket to hold cards and a duck wicker basket to hold buttons and magnets. They made for a fun display which fitted in with my merchandise, but did not dominate it.
To add interest and so that customers could see the t-shirt designs without unfolding them, I used my lengths of plastic tubing to hang t-shirts from on the wall. I balanced the tubing on a push pin. It worked great and looked a lot better than using hangars. This method also avoids stretching the necks of the shirts. I like to use children's hangars for hanging t-shirts as far as possible. They are smaller and are less likely to stretch the neck holes.
Arranging Merchandise. I arranged the shirts organically around the bases of my mannequins. I put the darker t-shirts to the front, and the more colorful ones towards the middle of the table. The eye will see the dark shirts and then be drawn in to the colorful shirts in the middle. I always put the white shirts away from the edges of the table as they get grubby easily.
Table Coverings. Use an attractive cloth covering to your table. It should cover the table and then fall to the fall on all sides. This enables you to hide your boxes underneath. I have found flat Queen size bed sheets to work well as under cloths. To smarten these up I used some sari lengths that I had bought in India years ago. I had quite a few compliments on them!
Use Attractive Displays and Props That Fit In With The Look of Your Merchandise.
To hold bookmarks I used an old wood cigar box that I had found at an estate sale in Cape Cod. I also had a wire basket to hold cards and a duck wicker basket to hold buttons and magnets. They made for a fun display which fitted in with my merchandise, but did not dominate it.

Payment and Packaging. If possible have a separate small table in a back corner of your booth for paying at and packaging. Use a receipt book with two copies - one for you and one for the customer. I always get the customer to write out their e-mail and name for me at the top of the receipt. I then write out in detail what they have purchased. For t-shirts, I write the size, design and color. This makes it much easier to keep a track of inventory when you get home. For prints, I write out the name, color and number in the edition. This year I purchased some small paper bags to put the t-shirts in. It looks a lot more professional than not using anything. For prints, I have a protective sleeve, cardboard stiffeners and a stiff cardboard envelope. Always put a business card in with your customer's purchase.
A Final Piece of Advice. Greet your customers with a smile and let them know that you are there to help them if they have any questions, then leave them to browse. Never stand at the entrance of your booth. This is intimidating, a bit like getting past the bouncer. People will be more likely to walk if they are made to feel uncomfortable.
Subscribe to:
Posts (Atom)